Hi! I'm glad you found my site, but I've moved to another one! So if you like what you see, come visit my new blog at http://www.ellemm.com - there you'll find all the posts from this site, plus up-to-date posts about growing veggies, farming, rural life, and more! - Laura

Tuesday, April 30, 2013

Green Growing Things

Seedlings continue to pop up fully. I was late on getting them started but I am way ahead of last year, so I count it a success! Here are the Pink Brandywines.


Meanwhile, the sugar snap peas are doing great outside. The snow and thunderstorms haven't bothered them at all, and they are pushing up vigorously through the soil to spread their little leaves.


Monday, April 22, 2013

Pink Brandywine Wins the Race

The first seedlings have sprouted! Here are the lovely young Pink Brandywines (Burpee).


I was worried the temperature might not be warm enough; they are in a building where the heat is only set to 55F, but the fluorescent lights (5000K daylight bulbs), seem to be giving off enough heat to bring that up to snuff. I am not sure about the peppers, though; they like a warmer soil temp than others (80-90F) and I don't think it's quite that warm. I can move them to a sunny windowsill if needed.


Checking up on the other few things growing around the place... the rhubarb we transplanted at the beginning of April is doing great, and the strawberries are slowly adding some new leaves to the ones that survived the winter.


The plants from last year have a touch of sunburn (frost burn? I don't know) around the edges. Those are the two larger trios above. The rest are all new this spring. Happily there are about 3 dozen other spots starting to look just like this one, so it should be a nice productive patch this year!

Sunday, April 21, 2013

Where is Spring?

It's been two weeks, things got busy, but I did manage to get tomato, tomatillo, and pepper seeds started indoors. I was eagerly looking forward to taking pictures of the little sprouts, because I just can't bear to post any more photos of bare dirt. Things were looking up, and spring seemed to have arrived!

Then this happened. Ah, Michigan.


Monday, April 8, 2013

Sowing Leftovers

I found a bucket full of sprouting onions in the garage the other day.


Last year we planted a variety of onion sets (immature onion bulbs grown from seed), harvested some, let them dry, and cooked with them. All very tasty. When it was finally too cold to do anything else in the garden, we pulled the rest out, stuck them in a bucket, forgot about them, and they spent the winter in the garage.


Last year's onions were pretty small, since we didn't weed or water them nearly as much as we should have (taking a 2 week vacation in July didn't help either). No sense in letting them go to waste, and we certainly aren't short on space in the garden, so why not plant them and see how they do this year?


After sorting out the soft and unusable ones, I was left with a pretty big pile of red, white, and yellow onions, plus a couple varieties of shallots.


They look pretty nice for such neglected little veggies.


I spaced these all about 4 inches apart, so they should have plenty of room to grow if they are inclined to do so. If nothing else, it is nice to see some green in the garden this early!


May 16 Update: these guys have taken off! I'm so pleased that they haven't gone to waste after all.


Sunday, April 7, 2013

Peas, Please!

It's early April. The garden is bare and brown. I look at the packet of peas. "Plant the first sowing in early spring as soon as the soil can be worked," it says. "Ok!" I says.


First to prepare the humus. This is powdery black stuff comprised of organic matter and beneficial bacteria that inoculates seeds and keeps them healthy.


The package directs you to mix it with water and dunk the seeds in it, but you can also just sprinkle it over the seeds before you cover them with dirt. I chose to mix it up with water just because. Here it is, a very appealing sauce:


Add the dry peas... this is starting to sound like a cooking blog.


And mix together the whole shebang until well-coated.


The peas are going in a shallow trench where I already put up a twine trellis.


And here it is, smoothed over and watered. The dirt is pretty terrible looking, isn't it? Nothing like the nice dark soil that comes in a bag from the garden store.


But miracles happened last year, so I have high hopes this time around!

Saturday, April 6, 2013

Pea Trellis

The peas I'll be growing this year are sugar snap peas, a variety that grows on tall vines and does need support. I've seen some nice looking trellises made with a variety of reclaimed materials, but I'm really not crazy about untangling dried-out-vines from the pieces I want to keep for next year. So I decided to use metal posts and twine - the posts should last a few years, and the twine can simply be cut away and tossed in the compost with the vines after they're finished.


The raised row on the left is where the peas will be sown. It's 30 feet long, and I've marked with wooden stakes where the posts will go, roughly six feet apart.


These are five-foot-long light duty T-posts, they cost me $3.29 each and have holes in the sides which are perfect for feeding twine through. After being hammered a foot into the ground, of course, they are now four-foot posts. That's probably not tall enough, as these vines may grow six feet or more, but this was what was in stock and I was anxious to make some progress in the garden. So we'll see how well it works.


Once the posts were firmly in place I threaded twine through the holes to make a ladder, tying it a few times at the ends so that, if it breaks and I need to re-string it, hopefully the peas won't all fall down. The vines do support themselves for six inches or more, so the twine doesn't have to be too tightly spaced. It does need to be fairly taut, though, and it needs to be strong twine. This isn't.


I originally intended to use baling twine, which we have in copious amounts for haying, to weave through the the posts, but I saw a roll of "tomato twine" on the shelf at the store and figured I would try it out. I should've stuck to my plan. The stuff frays ridiculously easily, and I can practically rip it apart by hand. So I plan to double up the job with sisal baling twine before the peas grow very tall.

Friday, April 5, 2013

Tilling the Garden, Finally!

The snow is gone, the ground is thawed, the mud is dried... finally, time to till the garden! I have been waiting for this day since... oh, about February. This year's garden is 65 feet by 100 feet, nearly double the size of last year's, and now that everything has been moved out of the way, it's time to call in the tractor!


Here's Justin, making some nice straight lines in the dirt. The edge of the garden is in shadow - it will get a little late-afternoon shade from the new barn, but not much. This photo was taken around 3:30 p.m., so even the western-most spot will get 7+ hours of sunshine.


Next day's photo of the garden... my official 2013 "before" picture. It's like a blank canvas, and I can't wait for it to be full of green! You can see where last year's garden was... those nice smooth sections in the middle of the picture. The darker portion at the right of the photo is where we dug up part of the hayfield to expand the garden. That half will get tilled again in a few weeks to take care of all the weeds that will undoubtedly spring up. So I can't touch it for now. Not really a problem: that's where the tomatoes are going, along with other veggies that don't get transplanted or sown for another 6 weeks. Besides, I still have 3000 square feet to work with for now!

Wednesday, April 3, 2013

Transplanting Rhubarb

It's spring! Things are waking up in the garden and it's time to get moving - literally. With the clay-filled soil we have here, most plants have it tough from the start, especially when they are breaking through the winter-crusted ground to stretch their baby leaves, like this rhubarb. Looks like a green brain to me.


Four plants were started from bare roots last year and did relatively well without any special care. But we need to till the garden and they are in the way, so they're being transplanted to a new spot inside the backyard fence. This should also keep the deer away - they didn't eat the plants last year, but had no problem tromping all over them to get to the other garden goodies like corn and beets.


This really is a tough looking plant. The all-knowing internet informs me that it's ok to divide rhubarb in early spring, so I figure it will be fine to transplant it, since that's practically the same thing. It's not ideal to move it in its second year of growth, but it won't be the end of the world.


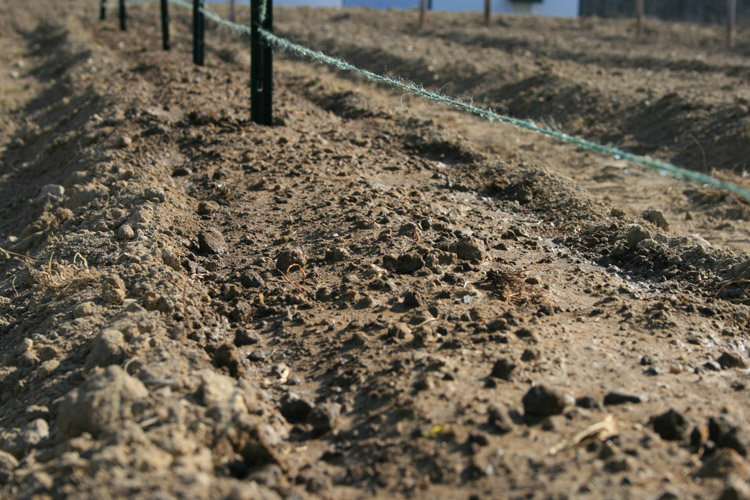
Here's the new home. The yard slopes down a little away from the fence, so I'm going to build a slightly raised bed right on top of the grass.


I've outline the bed with some brick pavers and dug holes through the grass where the rhubarb will be planted. The rest of the grass will be covered up with a few inches of topsoil, so I didn't bother removing the rest of the sod.


Starting to dig out the first root ball. Doesn't seem so bad. The roots are close to the surface, maybe this will be an easy job after all! Yeah, right...


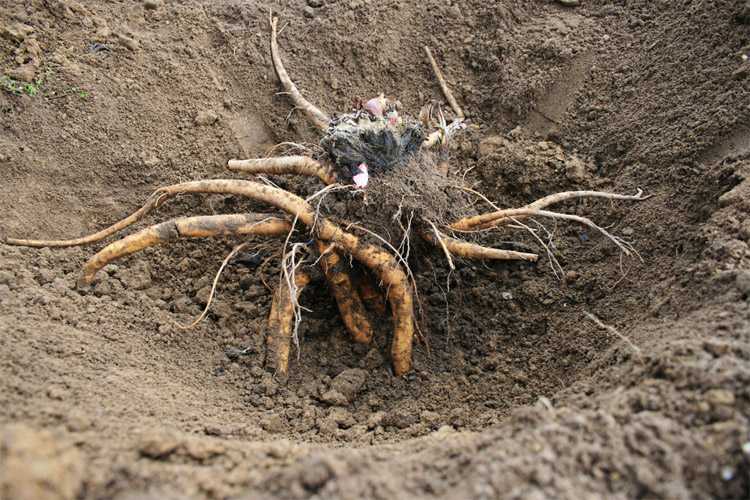
Six inches down and the roots are as thick as carrots. That's great for the plant, not so great for the person digging it up. You can see I already chopped one of the roots in half, but rhubarb is a hardy beast and will heal up just fine.


Not much closer to pulling this thing out of the ground. I felt like a paleontologist, gently brushing the dirt away and trying not to damage anything. I was not be so careful with the subsequent plants.


Finally got it out of the ground. Time for your new home, little tentacle monster.


Once I had the four plants in place with topsoil mounded around them, I covered the surrounding area with scraps of landscape fabric to deter the grass from growing through the bed. Brick pavers hold down the edges and will form a short retaining wall to keep everything in place once I cover this with dirt.


Done for the day. It's about 8 pm by this point and the sun is long gone, so the colors in my photos don't match. Deal with it! The newly transplanted rhubarb gets a good watering; I'll finish filling the bed tomorrow.


Ta-da! One sunny afternoon and several wheelbarrows full of dirt later, the rhubarb bed is filled, soaked with water, and pronounced complete. Ok, so it just looks like an empty bed right now, but I have high hopes!

Now, I'm sure my landscaping skills need work, but hold your critiques right there: I have a bit of a disclaimer. The house and entire back yard are slated for complete demolition when a new house will be built more or less in the same place. So this is a temporary project that only needs to hold up for a few years, after which it will be time to dig up the rhubarb and move it to yet another new home.

Will I actually harvest any rhubarb this year? Good question. You are not supposed to harvest rhubarb in its first year of growth, since it needs all its leaves to gather energy to build its root system and get established in the ground. The second year - this year for me - you should be able to harvest a few stems, but that is based on the assumption that you left it in the same place as last year. I, on the other hand, have traumatized the rhubarb all over again and it needs to re-establish itself in its new home. So I should simply water the rhubarb and leave its lovely red stems alone this year. Patience and self-control are not my strong suits, however, and I can't promise I won't try to get enough for at least one pie!

April 22 update: Once the rhubarb was growing well, I spread a bale of straw over the bed to keep moisture in and protect the fragile leaves.


May 5 update: These guys have really taken off! The plant below is actually starting to flower, which means it's healthy, but I will need to cut off the flowers to coax the plant into sending up more shoots. We'll definitely have a pie or two this year.